Gymnasium floors are the crown jewel of any athletic facility, representing a major capital investment and a direct reflection of institutional pride. For contractors and facility managers alike, maintaining a flawless, high-performance visual standard while ensuring maximum durability is always a top priority. Whether you are managing an elite NCAA hardwood court or a high-traffic community center gym, the right finishing system dictates both the lifespan of the wood and the safety of the athletes who play on it.
To achieve that pristine, mirror-like gloss and unparalleled scuff resistance, water-based finishing systems have officially become the modern industry standard. Leading this technical evolution is the GameTime Water-Based Finish System. Engineered specifically to handle the extreme expansion, contraction, and high-impact wear of sports floors, this system delivers rapid cure times, extremely low VOCs, and exceptional clarity without the yellowing or brittle failure modes of outdated oil-modified alternatives.
This comprehensive guide provides step-by-step technical execution protocols for two essential wood flooring workflows: a complete Water-Based Sand and Finish Protocol (ideal for new installations or complete court transformations) and a routine Screen and Recoat Protocol (perfect for annual maintenance). Throughout this guide, we will outline exact application procedures, mapping techniques using GameTime Chameleon Paints, and premium preparation strategies utilizing Virginia Abrasives consumables to ensure a flawless, long-lasting bond.
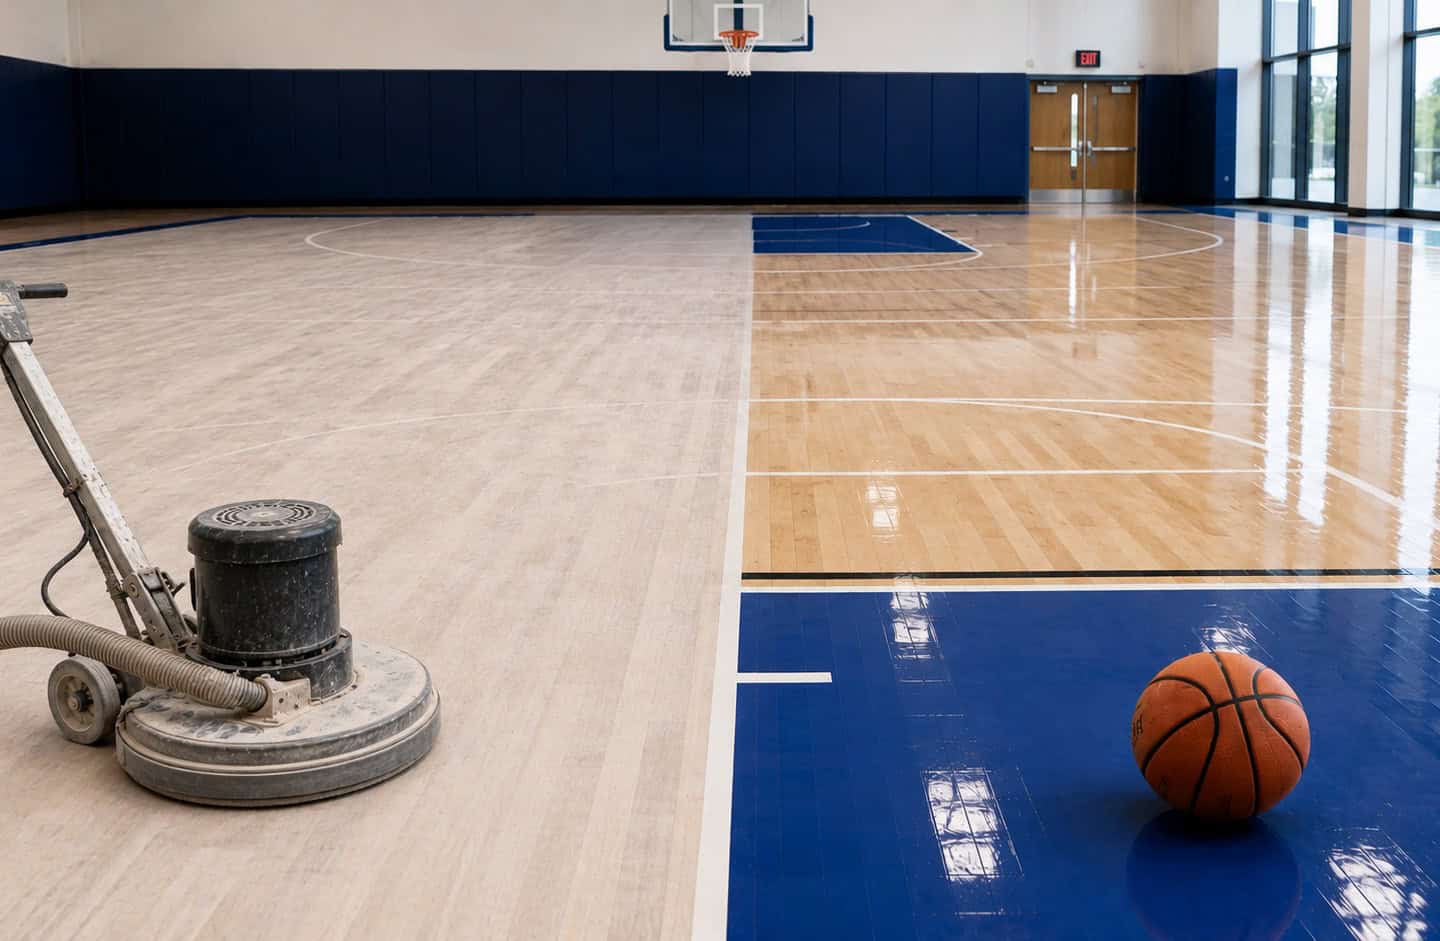
This heavy-duty mechanical procedure applies to both newly installed raw wood sports floors and older, previously finished hardwood courts that suffer from deep ambering, severe scratches, or uneven over-wood. This process strips the floor back to its raw structural state to establish a perfectly flat, receptive canvas.
1. New Installation and Sand and Finish Protocol
Phase A: Deep Substrate Preparation & Sanding Sequence
- Step 1: Coarse Mechanical Stripping. Sand the floor using a premium drum sander equipped with a Virginia Abrasives Coarse Grit Sanding Belt. This initial pass must be aggressive enough to completely level any over-wood from a new installation or shear off decades of old, heavy topical coatings.
- Step 2: Progressive Fine Sanding. Proceed methodically through your sanding sequence, moving down to medium grits and finishing with a 100-grit belt on your drum sanders and edge sanders. Pro Tip: Never skip more than one grit size in your sequence (e.g., transition from 40 to 60 to 100); skipping too many grits leaves deep, invisible micro-scratches that water-based finishes will highlight and magnify once cured.
- Step 3: Final Rotary Screening. Screen-sand the entire floor surface for its final smoothing pass using a Virginia Abrasives 120-Grit Screen Disc mounted on a standard low-speed rotary sanding machine. This step blends the drum-sanded fields with the edged borders seamlessly.
⚠️ SAFETY ALERT: Prevent Spontaneous Combustion Thoroughly vacuum up all residual wood dust immediately. Fine wood dust impregnated with old finish resins is highly combustible. Always dispose of wood dust in an airtight, external fire-safe container immediately after collection to mitigate the risk of spontaneous combustion.
Phase B: Foundation Sealing & Undercoating Stage
- Step 4: Initial Sealer Application. Apply the first foundational coat of GameTime Hybild Sealer at a target coverage rate of 400 sq. ft. per gallon. Note that coverage metrics may vary slightly depending on the natural dryness of the wood and the structural expansion gaps built into the floor system.
- Step 5: First Intercoat Abrasion. Allow the Hybild sealer to dry completely for a mandatory minimum of 2 hours. Once dry, mechanically abrade the entire surface using a Virginia Abrasives 150-Grit Screen Disc to knock down grain raise and create physical anchor sites for the next layer.
- Step 6: Decontamination and Tacking. Vacuum the entire floor thoroughly using a commercial backpack vacuum with a brush attachment. Follow immediately by tacking the floor with a clean, microfiber mop damp with water or a recommended tacking solution until the surface is entirely pristine.
- Step 7: Second Sealer Application. Apply a second coat of GameTime Hybild Sealer, adjusting your target coverage rate to a thinner 500 sq. ft. per gallon as the wood pores are now partially sealed. Allow this layer to dry overnight, then repeat the exact mechanical abrasion and tacking steps detailed in Steps 6 and 7.
Phase C: Detail Graphics & Structural Topcoat Stage
- Step 8: Game Line & Graphic Mapping. Layout, tape, and paint all mandatory game lines, keys, borders, and custom team graphics using highly durable GameTime Chameleon Paints. This fast-drying formula ensures razor-sharp lines without bleeding.
- Step 9: Paint Deglossing. Once the paint process is fully complete and all graphics are completely dry to the touch, gently degloss the painted areas using a flexible Virginia Abrasives Maroon Conditioning Pad to ensure subsequent finish coats adhere perfectly to the paint film. Repeat the vacuuming and tacking sequence to remove all micro-dust.
- Step 10: First Structural Build Coat. Apply the first coat of GameTime water based sports floor finish at a consistent coverage rate of 500 sq. ft. per gallon. Ensure smooth, even passes using a heavy-weight applicator, and allow it to dry completely for a minimum of 3 to 4 hours.
- Step 11: Intercoat Evaluation. Inspect the floor texture closely. If the floor exhibits any rough patches or grain texture, repeat the 150-grit screening, vacuuming, and tacking workflow. Pro Tip: If the floor feels completely smooth after drying, the final coat of GameTime 1K can be safely “hot-coated” directly over the first coat without sanding, provided it is applied within 6 hours of the first application.
- Step 12: Final Defensive Topcoat. Apply the final topcoat of GameTime water based sports floor finish at a coverage metric of 500 sq. ft. per gallon. Ensure the space is closed off to all airflow, HVAC dust, and foot traffic during the initial curing phase to guarantee an immaculate, glass-like finish.
🕒 Mandatory Curing & Recovery Timeline
Crucial Warning: Water-based finishes dry quickly to the touch, but require a structured chemical cure timeline to reach full physical hardness and chemical resistance.
- 72 Hours (3 Days): Restored access for light foot traffic only. All entrants must wear soft-soled athletic shoes. No heavy equipment or rolling carts allowed.
- 7 Days (1 Week): Milestone for returning to full operational use. The court can be opened for full athletic play, scrimmages, and standard physical education activities.
- 30 Days (1 Month): Critical curing threshold. Do NOT cover the floor with protective tarps, do NOT roll out heavy metal bleachers, and use absolutely zero cleaning chemicals or topical floor gloss restorers. The finish must breathe to finish cross-linking successfully.
2. Screen and Recoat Protocol
For facility managers looking to maximize budgets and bypass extended operational downtime, a full sand and finish isn’t always necessary. If your existing floor finish is intact but showing superficial surface scuffs, light scratches, or a dulling gloss level, the Screen and Recoat Protocol is your ideal solution. This maintenance routine saves thousands of dollars, removes surface scuffs, and restores full coefficient of friction (slip resistance) overnight.
Step-by-Step Execution:
- Deep Surface Decontamination: Scrub the floor thoroughly using an auto-scrubber or a heavy-duty rotary machine equipped with a specialized floor cleaner to lift skin oils, sweat, dirt, and any temporary traction enhancers. The surface must be completely free of contaminants before abrading.
- Mechanical Abrasion (Screening): Abrade the entire floor using a Virginia Abrasives 120-Grit or 150-Grit Screen Disc to profile the old finish. This creates thousands of microscopic scratches (a mechanical profile) that force the new topcoat to physically interlock with the existing floor structure.
- Immaculate De-Dusting: Vacuum the entire perimeter using backpack vacuums, followed by multiple passes of a microfiber tack cloth system damp with water. A completely dust-free floor guarantees a smooth, blemish-free finish.
- Graphic Touch-Ups (Optional): If any game lines or logos have worn through or chipped, carefully mask off those sections and apply GameTime Chameleon Paints to restore visual clarity. Allow the paint to dry completely, then scuff lightly with a maroon pad before continuing.
- Maintenance Topcoat Application: Apply a single defensive layer of GameTime water based sports floor finish at a coverage rate of 500 sq. ft. per gallon using a T-bar or lightweight floor coater. Cross-reference the standard Mandatory Curing & Recovery Timeline above to restore play safely.
| Product Description & Use Case | Recommended Coverage | Mandatory Cure/Dry Intervals |
|---|---|---|
| GameTime Hybild Sealer (First Coat) | 400 sq. ft. / Gallon | 2 Hours minimum dry time before mechanical abrasion |
| GameTime Hybild Sealer (Second Coat) | 500 sq. ft. / Gallon | Overnight minimum dry time before abrasion & paint |
| GameTime Chameleon Paints (Graphics) | Custom layout dependent | Allow to dry completely to touch; abrade with Maroon Pad |
| GameTime 1K Sports Finish (Build & Topcoat) | 500 sq. ft. / Gallon | 3–4 Hours between coats; 72 Hours for light foot traffic; 7 Days for play |
Ready to deliver an elite-level, high-gloss shine that withstands the most aggressive athletic play? Do not compromise on your consumables. Invest in professional-grade preparation and coating systems to ensure a flawless bond that eliminates peeling and premature floor wear.
- Shop Virginia Abrasives Sanding Belts & Screens: Secure the perfect surface profile and prevent skipped grit marks with premium abrasive technology.
- Order GameTime Hybild Sealer & 1K Finish: Upgrade your court’s defense with our high-solids, impact-resistant premium protection coats.
- Explore GameTime Chameleon Paint: Browse our vibrant, fast-drying, ultra-durable specialty aesthetic and detail line products.